spring ai alibaba
spring ai alibaba
maven 依赖
<!-- Spring AI 新建2025.9-->
<spring-ai.version>1.0.0</spring-ai.version>
<!-- Spring AI Alibaba 新建2025.9-->
<SpringAIAlibaba.version>1.0.0.2</SpringAIAlibaba.version>

 <!-- Spring AI Alibaba -->
<dependency>
    <groupId>com.alibaba.cloud.ai</groupId>
    <artifactId>spring-ai-alibaba-bom</artifactId>
    <version>${SpringAIAlibaba.version}</version>
    <type>pom</type>
    <scope>import</scope>
</dependency>
<!-- Spring AI -->
<dependency>
    <groupId>org.springframework.ai</groupId>
    <artifactId>spring-ai-bom</artifactId>
    <version>${spring-ai.version}</version>
    <type>pom</type>
    <scope>import</scope>
</dependency>
开发简单流程
- 新建 module
- pom 添加依赖
- 写 yaml
- 主启动
- 业务类
调用模型
pom 添加配置
<!-- 阿里云 DashScope(通义千问) -->
<dependency>
    <groupId>com.alibaba.cloud.ai</groupId>
    <artifactId>spring-ai-alibaba-starter-dashscope</artifactId>
</dependency>

<!-- 智谱 GLM -->
<dependency>
    <groupId>org.springframework.ai</groupId>
    <artifactId>spring-ai-starter-model-zhipuai</artifactId>
</dependency>

<!--spring-ai-openai-->
<dependency>
    <groupId>org.springframework.ai</groupId>
    <artifactId>spring-ai-starter-model-openai</artifactId>
</dependency>

<!--ollama-->
<dependency>
    <groupId>org.springframework.ai</groupId>
    <artifactId>spring-ai-starter-model-ollama</artifactId>
    <version>1.0.0</version>
</dependency>
yaml
spring:
  application:
    name: SAA-01HelloWorld
  ai:
    # ====SpringAIAlibaba Config=============
    dashscope:
      api-key: apikey
      chat:
        options:
          model: deepseek-v3
    # ====智谱glm Config=============
    zhipuai:
      api-key: apikey
      base-url: https://open.bigmodel.cn/api/coding/paas # spring ai 会自动追加 /v4 导致我的编码套餐路径不正确
      chat:
        options:
          model: glm-4.7
    # 符合openai协议接口的都可以调
    openai:
      api-key: apikey
      base-url: base-url-openai兼容点
      chat:
        options:
          model: gpt-3.5-turbo
    # ====Ollama 本地模型 Config=============
    ollama:
      base-url: http://localhost:11434 # Ollama 默认端口
      chat:
        options:
          model: qwen2.5:7b # 本地已拉取的模型名称
Controller
@RestController
public class ChatHelloController
{
    // 这里选择注入zhiPuAiChatModel

    // 如果注入ChatModel要这样写:
    // @Resource
    // @Qualifier("zhiPuAiChatModel")
    // private ChatModel zhipuModel;
    // 因为配置了两个starter自动配置。

    //或者@Resourse(name = "zhiPuAiChatModel")

    @Resource
    private ZhiPuAiChatModel zhiPuAiChatModel;

    // Ollama 本地模型注入
    @Resource
    private OllamaChatModel ollamaChatModel;

    /**
     * 通用调用
     * @param msg
     * @return
     */
    @GetMapping(value = "/hello/dochat")
    public String doChat(@RequestParam(name = "msg",defaultValue="你是谁") String msg)
    {
        String result = zhiPuAiChatModel.call(msg);
        return result;
    }

    /**
     * 流式返回调用
     * @param msg
     * @return
     */
    @GetMapping(value = "/hello/streamchat")
    public Flux<String> stream(@RequestParam(name = "msg",defaultValue="你是谁") String msg)
    {
        return zhiPuAiChatModel.stream(msg);
    }

    /**
     * Ollama 本地模型调用
     * @param msg
     * @return
     */
    @GetMapping(value = "/hello/ollama")
    public String ollamaChat(@RequestParam(name = "msg",defaultValue="你是谁") String msg)
    {
        return ollamaChatModel.call(msg);
    }

    /**
     * Ollama 本地模型流式调用
     * @param msg
     * @return
     */
    @GetMapping(value = "/hello/ollama/stream")
    public Flux<String> ollamaStream(@RequestParam(name = "msg",defaultValue="你是谁") String msg)
    {
        return ollamaChatModel.stream(msg);
    }
}
多个 ChatModel 配置
自动装配方式(推荐)
只要引入对应的依赖并配置好 yaml,Spring AI 会自动创建这些 Bean:
dashScopeChatModelzhiPuAiChatModelollamaChatModelopenAiChatModel
直接注入使用即可,无需手动写配置类。
手动配置方式(同类型多实例场景)
如果需要同一类型创建多个实例(比如两个不同配置的 Ollama),才需要手动写配置类:
@Configuration
public class ChatModelConfig {

    // 本地 Ollama
    @Bean("ollamaChatModel")
    public OllamaChatModel ollamaChatModel() {
        return OllamaChatModel.builder()
            .ollamaApi(new OllamaApi("http://localhost:11434"))
            .defaultOptions(OllamaOptions.builder()
                .model("qwen2.5:7b")
                .build())
            .build();
    }

    // 阿里云 DashScope
    @Bean("dashScopeChatModel")
    public DashScopeChatModel dashScopeChatModel() {
        return new DashScopeChatModel(
            new DashScopeApi("your-api-key"),
            DashScopeChatOptions.builder()
                .model("deepseek-v3")
                .build()
        );
    }

    // 智谱 GLM
    @Bean("zhiPuAiChatModel")
    public ZhiPuAiChatModel zhiPuAiChatModel() {
        return new ZhiPuAiChatModel(
            new ZhiPuAiApi("your-api-key"),
            ZhiPuAiChatOptions.builder()
                .model("glm-4")
                .build()
        );
    }
}
然后用 @Qualifier 注入:
@Resource
@Qualifier("ollamaChatModel")
private OllamaChatModel ollamaModel;

@Resource
@Qualifier("dashScopeChatModel")
private DashScopeChatModel dashScopeModel;

@Resource
@Qualifier("zhiPuAiChatModel")
private ZhiPuAiChatModel zhiPuModel;
ChatClient
chatclient 和 chatmodel 的区别
chatmodel 是底层接口,适用于简单的调用大模型,提供了 call 和 stream 方法。
ChatClient 是高级封装,基于 ChatModel 构建,适合快速构建标准化复杂 AI 服务,支持同步和流式交互,集成多种高级功能。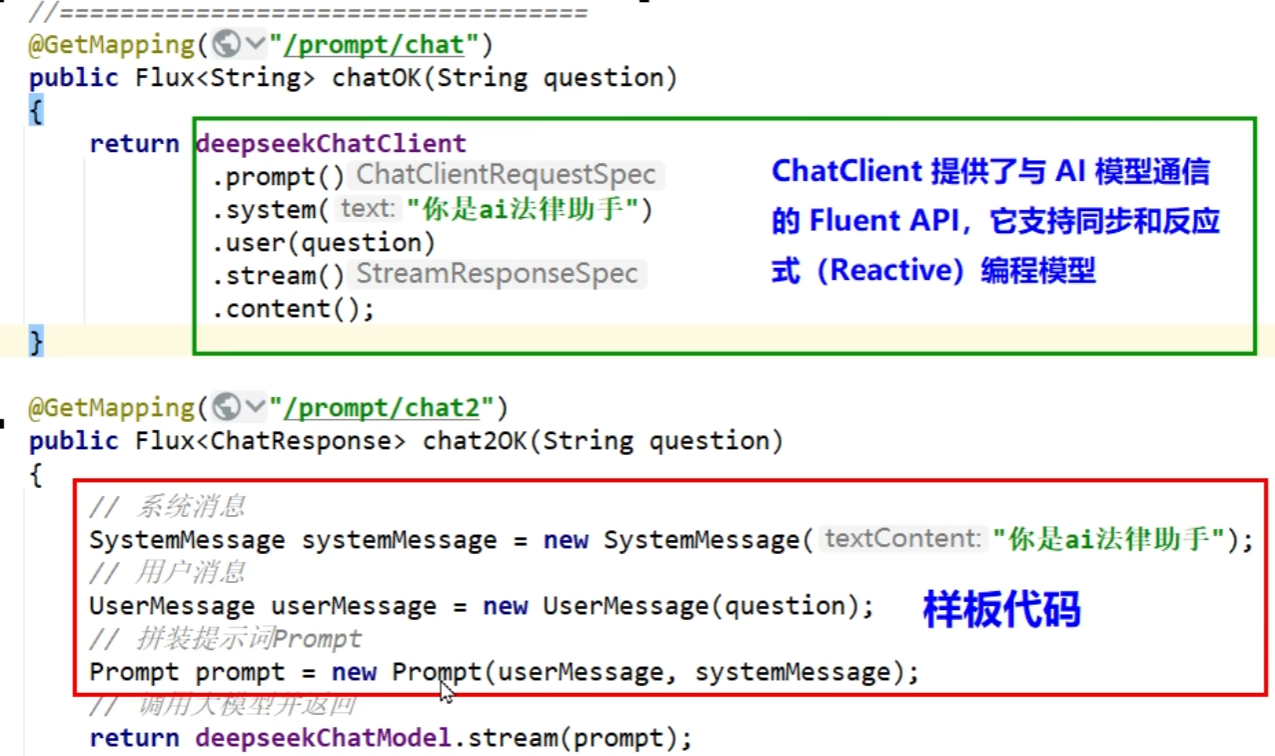
chatclient 流式编程方便
chatclient 不能自动注入
//直接自动注入不可以
@Resource
private ChatClient chatClient;
使用方法
- 使用自动装配的 chatclient(仅限于 spring ai 自动装配好了 chatmodel,就是只有一个 chatmodel)
默认情况下,Spring AI 自动配置单个 ChatClient.Builder bean。
@RestController
class MyController {

private final ChatClient chatClient;

public MyController(ChatClient.Builder chatClientBuilder) {
    this.chatClient = chatClientBuilder.build();
}

@GetMapping("/ai")
String generation(String userInput) {
    return this.chatClient.prompt()
    .user(userInput)
    .call()
    .content();
}

}- 使用多个 chatmodel
在使用多个 AI model 时,您可以为每个 model 定义单独的 ChatClient bean:
import org.springframework.ai.chat.ChatClient;
import org.springframework.context.annotation.Bean;
import org.springframework.context.annotation.Configuration;

@Configuration
public class ChatClientConfig {

@Bean
public ChatClient openAiChatClient(OpenAiChatModel chatModel) {
    return ChatClient.create(chatModel);
    //或者以下是等价的,只不过builder可以配置更多东西;
    // return ChatClient.builder().chatModel(chatModel).build();
}

@Bean
public ChatClient anthropicChatClient(AnthropicChatModel chatModel) {
    return ChatClient.create(chatModel);
}
}

// 或者
@Bean("openAiChatClient")
public ChatClient openAiChatClient(@Qualifier("openAiChatModel") ChatModel chatModel) {
    return ChatClient.builder().chatModel(chatModel).build();
}
然后可以使用 @Qualifier 注解将这些 bean 注入到应用程序组件中:
@Resourse
@Qualifier("openAiChatClient")
private ChatClient chatClient;

@Resourse
@Qualifier("anthropicChatClient")
private ChatClient anthropicChatClient;

@GetMapping("/ai/openai")
String openAiChat(String userInput) {
    return this.chatClient.prompt()
    .user(userInput)
    .call()
    .content();
}

@GetMapping("/ai/anthropic")
String anthropicChat(String userInput) {
    return this.anthropicChatClient.prompt()
    .user(userInput)
    .call()
    .content();
}
SSE
Server-SentEvents(SSE)是一种允许服务端可以持续推送数据片段(如逐词或逐句)到前端的 Web 技术。通过单向的 HTTP 长连接,使用一个长期存在的连接,让服务器可以主动将数据"推"给客户端,SSE 是轻量级的单向通信协议,适合 AI 对话这类服务端主导的场景。
核心概念
SSE 的核心思想是:客户端发起一个请求,服务器保持这个连接打开并在有新数据时,通过这个连接将数据发送给客户端。
这与传统的请求-响应模式(客户端请求一次,服务器响应一次,连接关闭)有本质区别。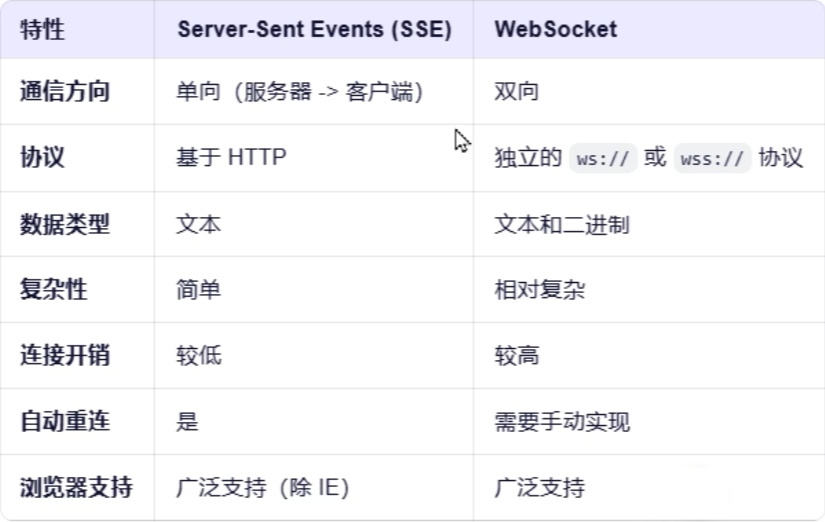
SSE 下一代 Stream able HTTP,比较新,双向的。
流式输出
/**
     * Ollama 本地模型流式调用
     * @param msg
     * @return
     */
    @GetMapping(value = "/hello/ollama/stream")
    public Flux<String> ollamaStream(@RequestParam(name = "msg",defaultValue="你是谁") String msg)
    {
        return ollamaChatModel.stream(msg);
}提示词
Prompt 中的主要角色(Role)包括:
系统角色(System Role):指导 AI 的行为和响应方式,设置 AI 如何解释和回复输入的参数或规则。这类似于在发起对话之前向 AI 提供说明。
用户角色(User Role):代表用户的输入 - 他们向 AI 提出的问题、命令或陈述。这个角色至关重要,因为它构成了 AI 响应的基础。
助手角色(Assistant Role):AI 对用户输入的响应。这不仅仅是一个答案或反应,它对于保持对话的流畅性至关重要。通过跟踪 AI 之前的响应(其“助手角色”消息),系统可确保连贯且上下文相关的交互。助手消息也可能包含功能工具调用请求信息。它就像 AI 中的一个特殊功能,在需要执行特定功能(例如计算、获取数据或不仅仅是说话)时使用。
工具/功能角色(Tool/Function Role):工具/功能角色专注于响应工具调用助手消息返回附加信息。
使用
chatclient 调用
chatClient.prompt()
    .system("你只能回答关于计算机方面的知识,其他内容无可奉告")
    .user(userInput)
    .call()
    .content();
chatmodel 使用,
SystemMessage systemMessage = new SystemMessage("你只能回答关于计算机方面的知识,其他内容无可奉告");
UserMessage userMessage = new UserMessage(userInput);
Prompt prompt = new Prompt(systemMessage, userMessage);

return chatModel.stream(prompt);